Materials:
-Paper
-Hands
 |
Step 1: Fold a square piece of paper
in half, then cut it on the crease.
|
 |
| Step 2: fold the paper in half, like the picture, then fold the 4 corners in to the center crease. |
 |
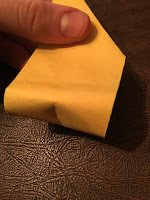
| Step 3: Fold the paper together then make a crease by folding the bottom edges up and pinch through both layers t the center, but do not crease the entire length of the paper. |
 |
| Step 5: Reinforce the dent in the paper that was made in step 3. |
Finally, with a finger and thumb on each side of the body, pinch the fingers together to make the butterfly flap its wings!
That is how you make an origami flapping butterfly. Are you someone who usually likes to skip instructions and doesn't like reading them? Well, with origami it is very important to read the instructions and look at the pictures of how to make the origami projects. Even in the book Origami In Action it says, "You'll have the best luck folding if you look at each step AND read the words underneath each step before you start folding" (Lang 9). so obviously it is good to read the instructions so you know what you are doing.
Citation: Lang, Robert J. Origami in Action: Paper Toys That Fly, Flap, Gobble, and Inflate! New York, St. Martin's Griffin, 1997.


No comments:
Post a Comment