Showing posts with label food. Show all posts

Monday, January 30, 2017

KOREAN FOOOOOOOOOOD!!! PART TRRRRRREEEEEEEE!!!

Gimbap (Seaweed and Rice Roll)

Hello! For this third post, I'm gonna try to make Gimbap. This is a Korean food that I've probably eaten since I was a kid. It looks and sort of is a lot like sushi, except that instead of fish, there's usually sausage in it along with eggs and some vegetables. Actually, there isn't really a specific set of ingredients you have to use. You can also really use any meat you'd like, or even none at all. This might be the most common one, but usually when I eat it I just take plain rice and seaweed and call that gimbap. Personally I've pretty much grown up with this meal, but I know some people who don't really like dry seaweed, so if you plan on eating something like this and aren't a fan of seaweed, BE WARNED!!! 

Ingredients

In order to make this meal (with this particular recipe) you must have...
  • 7 sheets of dried seaweed (10 inches x 8 inches)
  • 1 large gimbap sausage (or anything really)
  • 1 log of danmuji (pickled radish)
  • 4 cups of fresh cooked rice
  • Salt
  • 2 tbsp. of toasted sesame oil 
  • 2 tsp. of toasted sesame seeds
  • 3 eggs
  • 1 tbsp. of olive oil
  • 1 bunch of spinach
  • 1 large carrots, cut into matchsticks (Ha 142)
Ingredients!!!

Materials

These aren't listed in the book, but it'd probably be helpful to know you'll need...
  • A knife,
  • a pan,
  • a strainer,
  • a pot, 
  • a bowl (or three),
  • some plates,
  • and a sushi mat.

Steps

  1. So first of all, you're going to want to lay out all of your ingredients and materials (so that you can just use them easily). Also you'll probably want to wash your hands, especially because you'll need to use them a lot while making this.
  2. Place your rice into a large bowl and mix in 1/2 a teaspoon of salt, a tablespoon of sesame oil, and a pinch of sesame seed. Mix it together (Ha 143).
  3. Next "blanch the spinach for 30 seconds. Then drain it" (Ha 143).  Then squeeze out the water and season it with 1/2 a teaspoon of salt and 1/2 a teaspoon of sesame oil.
  4. For you eggs, crack them into a bowl and whisk them together. Then heat up a large pan with olive oil and cook your egg like an omelet (Ha 143). Then you'll want to cut them into strips.
  5. Cut your sausage into strips as well as you carrots, and saute both in a pan.
  6. Cut your pickled radish into strips as well.
  7. Make a small dish of toasted sesame oil (Ha 143).
  8. Now it is time to assemble to roll! First place your seaweed sheet on you sushi mat. Then take some rice and spread it throughout the sheet of seaweed.
  9. After that, make one line with each of your fillings on top of the rice.
  10. Now roll up the sheet and when you have rolled it all the way, give it a squeeze. (Ha 144).
  11. "Smear some toasted sesame oil on the finished roll to prevent it from sticking to the other rolls" (Ha 144).
  12. Now, cut your roll into 10-12 pieces. Set them on a plate and now you're done! 
Sauteing the carrots and sausage
Rice spread out, filling placed
ROLLING IT UP!
Cutting the roll
Gimbap

How do you eat it?

Just take a piece and eat it! There's actually plenty of different ways to make gimbap. You can change up the filling, etc. The one I use the most for just a simple snack (since I'm really not a great cook) are just small pieces of dried seaweed and rice. Nothing else.

How does it taste?

Personally for me, I've always loved sushi so dried seaweed is something I've grown used to. But I know some people don't like it so much, which is of course understandable. Gimbap is built a lot like sushi, except the filling is a bit different. There's pickled radish which is sort of sour. The gimbap sausage tastes sort of like seafood rather than beef or pork or some other meat. The egg, rice and vegetables balance everything out. 

Summary

To sum things up, gimbap is a cool, bit-sized snack that you can make pretty quickly. There are multiple varieties, some more complex and others really simple. I really liked that the recipe in the book I used gave specific directions on how to actually form the roll, and help it not completely fall apart your first time making it. If I were to make this meal again I would use bulgogi, which is Korean marinated beef. I think that using bulgogi instead of the sausage would make the gimbap tastier (that's how we usually make it as well). Thank you so much for reading, and seeeeeyaaaaaaaa next time!

Quick Questions:
  • Would you be willing to try out this meal?
    • Why or why not?
  • What would you change about this recipe?
          Ha, Robin. Cook Korean!: A Comic Book with Recipes. Berkeley: Ten Speed Press, 2016. Print.

KOREAN FOOOOOOOOOOD!!! PART FOOOOOOOOUUUURRRRRR!!!!

Kimchi Jjigae (Kimchi Stew)

Kimchi jjigae, or kimchi stew is one of the meals that I ate a bunch (and maybe still do) as a kid. It was easy and quick to make, and was still tasty and flavorful in my opinion. Of course though, kimchi isn't really something everyone might really like. It's known for it's pungent and strong (not in a good way) smell, which some people might really hate. So as you can probably guess, the main ingredient in this stew is going to be kimchi. Now... let's get cooking!

Ingredients

Some ingredients you're likely going to need are...
  • 8 ounces of pork bell,
  • 1 (1-pound) package of tofu,
  • 3 cups of kimchi,
  • 1 tbsp. of olive oil,
  • 1 cup of water,
  • 1/2 cup of kimchi juice,
  • 1 tbsp. of Korean red chili flakes,
  • and 2 tsp. of sugar (Ha 90).

Here are the ingredients!

Materials

Here are some materials you might need...
  • A pot, 
  • a knife, 
  • a cutting board,
  • and a large spoon or ladle.

Steps

  1. So first, you are going to want to wash your hands (of course!) and lay out your materials and ingredients so that they are easy to reach. 
  2. Take your pork belly and cut them into bite-sized pieces (Ha 90).
  3. "Cut the tofu and kimchi into bite-sized pieces too" (Ha 90).
  4. Next hear your pot, and add your oil along with your pork and kimchi. Stir and fry them for about 5 minutes (Ha 91).
  5. After those five minutes your going to want to add your water, kimchi juice, chili flakes and sugar into the pot. Stir, and then close the lid and leave the soup to boil for 15 minutes.
  6. With 15 minutes passed, you'll then want to add you tofu and leave the soup to boil for another 10 minutes (Ha 91).
  7. Now pour your soup into a bowl using your ladle/large spoon, and you have created kimchi jjigae/stew!
Adding the pork and kimchi
Pouring in the rest of the ingredients (except tofu)
Now adding the tofu

FINISHED!!!

How do you eat it?

So this soup/stew is pretty salty, so I'd definitely recommend eating it with rice or something. I mean there's no really special way to eat this meal. You'd just eat it like any other soup. However, the author in the book I'm using advises, "it might be quite spicy, so serving it with a glass of water would be wise" (Ha 91).

How does it taste?

I think that this dish is pretty flavorful, which can be a good thing or bad. It has an overwhelming kimchi taste, so if your not a fan of kimchi, this might not be your favorite meal ever. But for me, I like the flavor since I'm pretty used to kimchi by now. Although if your planning on going out and talking to people after eating this, I should warn you. Your breath might not smell too great.

Summary

In conclusion, this was a fun and simple dish to make. One good thing about the recipe in the book is that it helped to tell you where you can buy some of the ingredients. Like if you're not too familiar with pork belly, it tells you that you can find it typically in Asian grocery stores. One thing that I would change if I were to make this again is the amount of kimchi I put in the soup. It was a little too salty, and I think the amount of kimchi had a large part in causing that. I hope you enjoyed, thanks for reading!!!

Quick Questions:

  • Would you consider trying this meal?
  • What bothers you about this stew?
  • Have you eaten kimchi before?          
          Ha, Robin. Cook Korean!: A Comic Book with Recipes. Berkeley: Ten Speed Press, 2016. Print.

KOREAN FOOOOOOOOOOD!!! PART FIIIIIIIIIVVVVVVVVVEEEEEEEE!!!!!

Galbi (Beef Short Ribs)

Hi! For this final post, I'm going to be trying to make Korean barbecue. Korean barbecue consists of a variety of different dishes, but here I'll be trying to make galbi, which translates into ribs (Ha 58). This is probably one of my favorite Korean foods, and maybe one of the more well known ones. Generally in order to make this dish you'll want beef short ribs, but you can also use pork or chicken if you'd like (Ha 58). So let's get started!

Ingredients

So the ingredient you'll need are...
  • 3 lbs. of beef short ribs (we used L.A. galbi),
  • 1/2 of a small kiwi,
  • 1 small yellow onion,
  • 6 cloves of garlic,
  • 1 (1-inch) piece of ginger,
  • 1/2 a cup of soy sauce,
  • 1 tbsp. of of sesame oil,
  • 1 tbsp. of granulated sugar,
  • 2 tbsp. of brow sugar, 
  • 1 tsp. of ground black pepper,
  • and 3 green onions (Ha 58).

Here are the ingredients!

Materials

Some materials that you might find yourself needing include...
  • A tong, 
  • a bowl (or a few),
  • a blender,
  • a container,
  • a knife,
  • a grill (or just a pan),
  • a cutting board, 
  • a timer (maybe?), 
  • paper towels,
  • scissors,
  • and a large spoon or ladle.

Steps

  1. First of all, you're going to want to lay out your ingredients and materials so you can access them easily. And also be ready to wash your hands a lot since you might be touching raw beef.
  2. Take your ribs, and soak them in cold water in a bowl for about thirty minutes (Ha 58).
  3. While the ribs are soaking, you're probably gonna want to start making the marinade. "Peel the kiwi, yellow onion, garlic, and ginger. Chop them into chunky pieces and blend them in a food processor with the soy sauce, soju, sesame oil, granulated sugar brown sugar and pepper" (Ha 59).
  4. The marinade I made ended up being a little bit too salty, so feel free to add a little bit of water into it.
  5. Now you're gonna want to slice your green onions and mix them into your marinade.
  6. Now that your marinade is finished, drain the water from your ribs (once ready) and dry them off with paper towels. 
  7. Here the ladle or spoon might come in handy. "Put a layer of beef in a rectangular container and cover it with a generous amount of marinade. Repeat until there's no more beef and marinade left. Cover the container with a lid or plastic wrap" (Ha 59).
  8. Now that you've added your marinade, leave the ribs to marinate for three hours in your refrigerator (Ha 59).
  9. After those three hours are done, take out the ribs and get ready to grill! Turn your stove or grill up to a high heat and start grilling your ribs. You might want to cut the meat into smaller pieces using scissors. 
  10. Now you are done! Lay out your short ribs onto a plate and voilà, you just made some delicious Korean barbecue! 
Leaving the ribs to soak
Making the marinade
Adding the marinade
On the grill
Nothing like aesthetically pleasing green stuff at the top!!! (Green Onions)

How do you eat it?

Most of the time when I have galbi, I'd just eat it with rice to be honest, or with some other side dishes. But sometimes you would eat it with lettuce, chili paste, a sauce called ssamjang and other vegetables (Ha 59). This is call ssam, but usually when I have ssam, I don't really eat it with galbi. Usually we eat it with pork or something like that.

How does it taste?

Personally, I think this is definitely one of the better Korean dishes. It's really tasty and especially awesome to eat it hot, right off of the grill. I would really recommend this, which isn't really something I could say with the other foods I made in my blogs. I guess that's because there's not really anything particularly odd about it. It's not stinky like kimchi, and there's no seaweed in it like miyeokguk or gimbap.

Summary

Galbi is a simple but delicious dish that even I, a skill-lacking cook could make. I really like that the recipe in the book was really straightforward and easy but still detailed enough to know what exactly to do. One thing I would do next time is marinate it for a little longer, as three hours didn't seem like quite enough. Thank you for reading, and GOOOODBYEEEEE!!!

Quick Questions:
  • Have you ever tried out Korean BBQ?
    • Did you like it? Why or why not?
  • Would you make this dish?
  • What dish (out of the ones I posted about) looked most appetizing to you?
          Ha, Robin. Cook Korean!: A Comic Book with Recipes. Berkeley: Ten Speed Press, 2016. Print.

Minty Fresh Ice Cream

For my final blog, I will be making Sally McKenney's Mint Chocolate Chip Ice Cream Cupcakes. These treats are perfect for hot days and ice cream cravings. Personally, I don't like plain cupcakes. They are too bready and do not sit well on my taste buds, but I love ice cream cake. Sally says, "There is nothing quite like a giant waffle cone filled with mint chocolate chip ice cream on a hot sunny day" (McKenney 135).

In order to complete this recipe you will need:

  • 10 Oreos, crushed into crumbs
  • 2 tbsp of butter, melted
  • 1x8oz container frozen whipped topping thawed
  • 1-quart mint chocolate chip ice cream, softened
  • 4oz (225g) coarsely chopped semi-sweet chocolate, such as Baker's brand
  • 3/4 cup (30g) whipped cream
Preparation time for the dessert should take 15 minutes. This recipe will take at least four hours to complete. This will make 12 cupcakes, but because there are only nine cupcake holders available I made nine cupcakes.

Recipe:

  1. Line a 12-count muffin pan with cupcake liners. Set aside.
  2. Make the Crust: Combine the crushed Oreos and melted butter in a medium bowl. Divide between 12 cupcake liners (Nine for my demonstration) and press evenly into the bottom of each. Set aside. 
  3. Make the Filling: In a large bowl, stir the frozen whipped topping and ice cream together until softened and combined evenly. Spoon the mixture evenly into the cupcake liners. Freeze for at least four hours or until firm.


  4. Make the Topping: Right before removing cupcakes from the freezer. melt the semi-sweet chocolate in a small ball in the microwave in 20-second increments, stirring after each increment until smooth. 

  5. Remove the cupcakes from the freezer and drizzle melted chocolate over each. 
  6. Top each cupcake with 1 tablespoon of whipped cream. 
  7. Enjoy!
This dessert is best served right after whipped cream is applied. Sally Mckenney says, "The chocolate-drizzled cupcakes may be made 1 day in advance and garnished with whipped cream immediately before serving" (McKenney 135).

These were absolutely exceptional! By far, this is my favorite tasting dish. This recipe was fairly easy to make. The only downside is that it does require time to freeze, but it is definitely worth the wait. 
Do you enjoy ice cream? If you do what is your favorite flavor? If not what treat do you enjoy during hot days.

Thanks for reading!

McKenney, Sally. Sally's Baking Addiction: Irresistible Cookies, Cupcakes, & Desserts for Your Sweet-tooth Fix. New York, NY: Race Point, 2014. Print.

Chicken and Rice Soup

As my posts come to an end, I decided to make the classic home style chicken soup everyone loves and adores. I grew up eating a similar recipe throughout my childhood. My family loves this particular dish and we enjoy it constantly. As Carla Snyder mentions in the book, an amazing tip for seasoning your soup is with a little acid, for example, with a lemon. This really heightens the flavors in the soup instead of using the common salt or pepper. Throughout these few months I believe I've really improved my culinary skills, with even more practice I hope to improve even significantly more. If you're looking for an amazing chicken soup recipe, feel free to use Snyder's delicious recipe below.


Recipe (Serves 10)

Ingredients:
1 whole chicken
16 cups chicken stock
2 carrots, roughly chopped
2 celery stalk, roughly chopped
4 chopped potatoes
1/2 cup chopped onion
2 sprigs fresh thyme
5 cups cooked white rice
1/2 cup finely chopped fresh parsley
1 tbsp freshly squeezed lemon juice
Salt and freshly ground pepper

Preparation:
1. In a large pot, bring chicken and stock to a boil over medium-high heat. Partially cover, reduce heat to low and simmer gently until a thermometer inserted into the thickest part of the breast registers 170 degrees F, about 45 minutes. Skim the soup if any scum develops on the surface.
2. Using tongs, transfer chicken to a large plate and let cool slightly. Remove skin and bones and discard. Shred the meat into bite size pieces. Set aside.
3. Skim the fat from the surface of the stock with a large spoon and return to a simmer over medium heat. Add carrots, potatoes, celery, onion and thyme; simmer until vegetables are softened, about 15 minutes. Remove thyme sprigs. Return chicken to the pot and stir in noodles, parsley and lemon juice; increase heat to medium-high and bring to a boil, about 5 minutes. Season with salt and pepper to taste.
4. Put 1/2 cup of rice into bowl and ladle soup on top.


Snapshot of my bowl

Snyder, Carla, and Meredith Deeds. 300 Sensational Soups. Toronto: R. Rose, 2008. Print.
Sunday, January 29, 2017

Ricotta Cranberry Custard

Hello! For my final blog post, I have chosen to make "Ricotta Cranberry Custard" from my book, Petite Sweets.

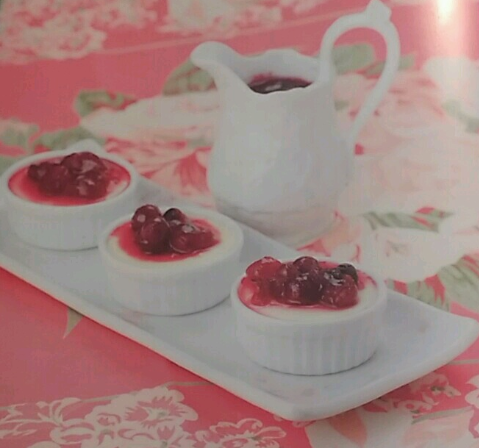
This recipe was chosen by my dad and older brother, Austin. I think my brother chose this because the picture from the book looks like cheesecake, and he loves cheesecake. But let me tell you, it's definitely not cheesecake. But we'll get to that later.

Ricotta Cranberry Custard from Petite Sweets (Ojakangas 98)
To start, I gathered the necessary ingredients: 

Custard: 
  • 12 ounces (1½ 8-ounce packages) cream cheese
  • ¾ cup ricotta cheese
  • 2 large eggs
  • ½ teaspoon pure vanilla extract
  • ½ cup sugar 
  • ½ cup heavy cream
Sauce: 
  • 2 cups fresh or frozen cranberries
  • 1 cup water
  • 1 cup sugar
First I preheated the oven to 250°F. Then I added the cream cheese to the electric mixer. 

But that's when I realized I only had one stick of cream cheese, instead of two, to complete the one AND one half ounces of cream cheese needed. 

Now that my whole recipe was off due to lack of one ingredient, I had to problem solve. I really wanted to get this done that day because the rest of the week I would be busy and I didn't want to put my mom in a bad mood by making her go all the way to the store just for one stick of cream cheese so, I did the only thing I could do. I adjusted the whole recipe. 
Since I only had 8 ounces of cream cheese instead of 12, I knew 8 divided by 12 was 2/3. That meant I would have to multiply my whole recipe by 2/3. 
So, I did. Except the eggs, which I just left at 2. 

Now that I was back on track, I started adding my ingredients to the electric mixer again; ricotta, eggs (one at a time), vanilla, sugar, and cream and mixed until combined (Ojakangas 99).

Once everything was smooth, I spooned the batter into two ramekins. After they were evenly divided among the two, I placed each one into a large, transparent baking dish. Then I poured "enough hot water into the baking [dish] around the ramekins to reach about halfway up the sides" (Ojakangas 99).
Carefully, I placed each baking dish with the ramekin inside into the oven and set it for 40 minutes. When 40 minutes had passed, I took them both out of the oven. "The top should not have changed color at all" (Ojakangas 99) and since it didn't, I knew I was on my way to making a successful dessert.
After they had cooled slightly, I wrapped both of the ramekins with saran wrap and placed them in the fridge, where they would stay and chill for about three hours. 

In the meantime, I started working on the sauce. Though, that didn't take long either. 
But I'm 90% sure I messed up the sauce too. My mom had gotten me a cranberry sauce can where all I had to do was heat it up and mix it around, but I didn't realize that so I put that in a pot and heated it up and mixed it around, as well as adding one cup of water and one cup of sugar. It came out fine though so nothing too problematic. 

So I wrapped that up like I did with the ramekins and placed it in the fridge where it would chill for three hours as well. 

When everything had chilled for three hours, I took it out of the fridge. 
And then I scooped the cranberries on top of the custard (I probably shouldn't have added so much cranberry to the first one).

What I learned from this experience is that custard ≠ cheesecake. I went into that first bite thinking something solid, but my spoon went through it like goo. Keep in mind that I hadn't really read the title of this recipe, I just saw the picture and went "ooh la la" and wanted to make it. I know what custard is... now. 

If I were to do this again, I'd probably try to find something better to do in those three hours where all I did was wait. Also, I would've made sure I had all my ingredients ahead of time.

I would recommend making this dessert if you have a lot of free time and like custard. Me? I don't like it so much. 

Have you ever tried a food that you thought would taste totally different based on it's looks? 

Thanks for reading!

Ojakangas, Beatrice, and Roger LePage. Petite Sweets: Bite-Size Desserts to Satisfy Every Sweet Tooth. Portland, Me.: Sellers, 2009. Print.

Chocolate Dipped Almond Biscotti

Hello! For this blog post I have chosen to make "Chocolate Dipped Almond Biscotti" from my book, Petite Sweets

This recipe was chosen by my mom because she loooves biscotti. She says it's perfect to eat in the morning with your coffee. I think it's just an excuse to eat some tasty dessert for breakfast. My mom also makes these around the Christmas time and dips the chocolate covered part into crushed candy canes for decoration (and taste).
Chocolate Dipped Almond Biscotti from Petite Sweets (Ojakangas 138)
 To make the Biscotti, I first had to gather all the ingredients I would need:

  • ½ cup sugar
  • 4 tablespoons (½ stick) butter, melted
  • 1 teaspoon pure almond extract
  • ½ cup almonds, chopped
  • 2 large eggs
  • 1 ¼ cups all-purpose flour
  • 1 ½ teaspoons baking powder
  • ¼ teaspoon salt
  • 1 cup semisweet chocolate chips

Before I started baking, I preheated the oven to 350°F. 
Then, using the electric mixer, I creamed the sugar, butter, and eggs until smooth (Ojakangas 139). Because my family isn't a huge almond fan, I left out the chopped almonds and also added a little less than the recommended amount of almond extract. When everything was smooth, I poured in the flour, baking powder, and salt. 

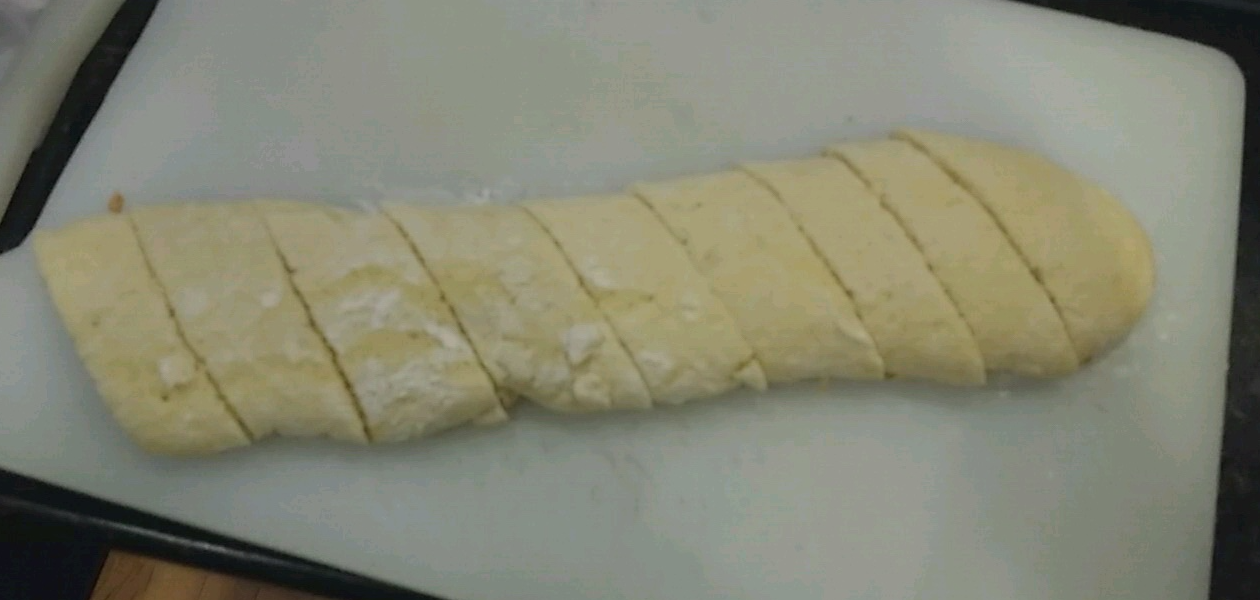
When everything was combined together, I split the dough in half and rolled out each half on a floured board. 
Once that was done, I transferred the dough onto a cookie sheet.
Then I baked the dough for 20-25 minutes. When it was firm, I "removed from the oven and let [it] cool slightly" (Ojakangas 139). Once it was cool enough for me to handle, I sliced both pieces of dough diagonally. 
 After slicing them, I evenly spread them out on the baking sheet and placed them back in the oven for 10 minutes.
 Then I took them out again, flipped each one, and placed it back in the oven for another 10 minutes, or until it was lightly browned and toasted (Ojakangas 139). 
Since the biscotti part was done, it was time to work on the chocolate dip. I took a small bowl, filled it with chocolate chips, and placed the bowl over boiling water. Every so often I stirred the chocolate chips until they started to melt and from there on I continued to stir them so they wouldn't burn on the bottom. 
When the chocolate was fully melted, I took each slice of the baked biscotti and dipped each one into the melted chocolate and voila! You have your biscotti.
If I were to do this recipe again, I would maybe think of a way to jazz it up, such as a decoration on top like my mom's crushed candy canes (but something different since I've already tried that) or maybe incorporating something into the dough like chocolate chips so you get them throughout the whole biscotti.

This recipe was a lot easier than my previous baking attempts, since I have perfected it by watching my mom in the past and getting her help during the process. I recommend this recipe if you want something good to go along with your coffee in the mornings. 

What recipes have you perfected? How did you perfect them? Did it take time and help?

Thanks for reading!

Ojakangas, Beatrice, and Roger LePage. Petite Sweets: Bite-Size Desserts to Satisfy Every Sweet Tooth. Portland, Me.: Sellers, 2009. Print.

Pho Bo

For this post I made my all time favorite, Vietnamese Pho Bo (Beef). This my family's all time favorite to the extent that we enjoy this dish almost bi-weekly. Thus I saw it fitting to attempt to recreate this dish at home. Although the result was very good, I would still prefer to dine out for this particular dish. But, Carla's tip of finding most of the ingredients at an Asian market was extremely helpful and certainly did make the process of making the dish more obtainable, the end result can't beat my favorite Pho spot. I still encourage you all to recreate and enjoy this dish, there is always room for modification as ell so that it can suit both you or your family's needs. 

Recipe (Serves 4)


Ingredients:
8 oz boneless beef sirloin, trimmed 
3 quarter inch thick slices ginger root
1 onion (unpeeled), halved
8 cups beef stock
2 whole star anise
1 stick cinnamon
4 oz flat rice noodles
2 tbsp fish sauce
2 tsp packed light brown sugar
1/2 tsp salt
Pinch of black pepper
1 serrano or other hot green chile pepper, seeded and thinly sliced
1 cup bean sprouts, rinsed
1/2 cup loosely packed fresh basil leaves
1/4 cup thinly sliced green onions
4 lime wedges

Preparation:
1. Place beef in the freezer for 20 minutes.
2. Heat a dry heavy skillet over medium-high heat. Add ginger and onion; saute until blackened in spots on all sides, about 5 minutes. 
3. In a large pot, bring stock, blackened ginger and onion, star anise and cinnamon stick to a boil. Reduce heat and simmer for 15 minutes to blend the flavors. Strain the stock and discard all solids. Return to pot. 
4. With a very sharp knife, cut partially frozen beef across the grain into paper-thin slices. Set aside. 
5. In a large bowl, cover noodles with boiling water; soak until completely softened, about 15 minutes. 
6. Return stock to a boil over medium-high heat. Stir in fish sauce, brown sugar, salt and pepper, if necessary. 
7. Drain noodles and divide among large bowls. Top with slices of raw beef. Pour about 2 cups of stock into each bowl. Garnish with chili pepper, bean sprouts, basil, green onion and lime wedges. 


Snapshot of my bowl

Snyder, Carla, and Meredith Deeds. 300 Sensational Soups. Toronto: R. Rose, 2008. Print.


Bean and Rice Chili

For this month, I made Chili. My family rarely eats this dish but we all agreed upon venturing out of our comfort zone and experience something new. With this delicious mixed bean soup we are glad we took the jump. With a thick consistency; thanks to Carla's tip of mashing some of the beans into the broth in order to thicken it; it was amazing. Even if you're not a big Chili fan like myself you should try this dish. It was delicious and very easy to make.

Recipe (Serves 8)


Ingredients:
3 tbsp Olive Oil
2 cups Chopped Onion
2 Carrots, chopped
4 Cloves garlic, minced
1 cup Dry red wine
1 can Diced tomatoes, with juice
4 slices Chopped Bacon
1 can Whole black beans
1 can Whole pinto beans
5 cups Chicken stock
2 cups Water
1 tsp Dried oregano
1/2 tsp Hot pepper flakes
1/2 tsp Ground cumin
1/2 tsp Chili powder
2 tsp Salt and ground black pepper
4 cups Cooked white rice
1/4 cup Fresh cilantro, minced
1 Lime cut into 8 wedges

Preparation:
1. In a large pot, heat oil over medium heat. Add onions and saute until softened. Add carrots and celery, saute until starting to soften. Add garlic and saute for one minute. Add wine, tomatoes with juice; cook until liquid is reduced by half.
2. Add bacon, beans, stock, water, spices; bring to a boil. Partially cover, reduce heat to low and simmer gently until beans are tender and bacon has flavored the soup; about 1 hour and 30 mins. Season with salt and black pepper to taste.
3. Divide rice among bowls and top with soup. Garnish with cilantro and lime.


Snapshot of my bowl.

Snyder, Carla, and Meredith Deeds. 300 Sensational Soups. Toronto: R. Rose, 2008. Print.


Chocolate Dobos Torte Rolls

Hello! For this blog post I have chosen to make "Chocolate (Dobos Torte) Rolls" from my book, Petite Sweets
I made these on a day when I was bored and wanted to make something easy. Based on the amount of ingredients and how simple the final product looked in the book, I thought it would be something I could whip up really quick and enjoy. Unfortunately, things definitely did not turn out the way I had planned. This probably turned out to be one of the harder recipes I made.

Just so you know what I had planned on eating at the end of the day, here's an image from my book:
Chocolate (Dobos Torte) Rolls from Petite Sweets (Ojakangas 30)
Looks good, right? Now take a look at the ingredients:

Cake:
  • 2 large eggs, separated
  • ½ cup powdered sugar
  • ¼ cup all-purpose flour
  • 3 tablespoons milk 

Chocolate Filling:
  • 1 cup semisweet chocolate chips
  • 8 tablespoons (1 stick) butter, soft

These are all common baking items so of course I already had all of them in the pantry and fridge ready to go. To start, I turned on the oven to 375°F. Then, in an electric mixer, I beat the egg yolks (that I had already separated) and powdered sugar. Once the mixture was thick, I "beat in the flour and milk until [the] batter [was] smooth" (Ojakangas 31). Once completed, I folded the mixture into a bowl with beaten egg whites. 
When everything was smooth and folded together, I spread the batter evenly over the parchment paper (Ojakangas 31) that I had already laid out. 
I placed the batter in the oven for 5-6 minutes. 
I wish I had mixed the egg more so that it didn't show as much in the final product, but it was edible, so I continued on with the directions. 
Or, I would have, if I had actually been able to peel the cake away from the parchment paper. Me, being the bad reader that I am, totally skipped over the directions which clearly stated, "Coat [the parchment paper] with nonstick spray and dust lightly with flour" (Ojakangas 31). 

I love having to do everything all over again. 

So, after throwing out my first miserable attempt at these chocolate rolls, I started my second batch. 
I repeated the whole process, this time making sure to mix the batter well instead of just folding the ingredients together in the last part. Oh, and I also sprayed the paper with nonstick spray. 
When evenly dispersed on the parchment paper, this batter clearly had less egg whites that were unbeaten compared to the last one. But, of course, one mistake was not enough for me. I had to be an unbalanced klutz and therefore, I accidentally made my batter run all over the baking sheet as I was traveling to the oven, so it wasn't as proportionate as I would've liked. This disaster resulted in... 
Many, many uneven spots and burning. The bottom of the cake was fluffier, which I think was how the whole product was supposed to be, and the top part barely had any batter so, with the extensive time in the oven, it burned. 

But I wasn't about to throw away this disaster yet. I took my spatula and cut out all the burned parts. Then I poked at each side of the paper slightly, and got it to separate. Now I was one step further than I had gotten last time. 

Since the cake part was finished, I started on the chocolate filling. This was the simple part. I placed a bowl on top of a pot of boiling water and filled it with the butter and chocolate chips. I stirred the two together and continued to do so until they were melted together. 
With both the cake and filling done, I started to spread the chocolate onto the cake. I didn't think ahead, though, and ended up spreading it on the whole thing. This didn't work out because, since I cut out the burned part, when I finished off the recipe by rolling the cake, some of the chocolate part wasn't covered by cake, as you can see below. 
Obviously, the end product looks nothing like the picture in the book. It's not as fluffy and cake-like. To me, it looked more like a tortilla. I thought it would be more pound cake-ish.

If I were to do this again... well, I wouldn't. But I guess I would make sure not to burn my cake (and maybe try to make it look more like a cake?) so when I rolled it, it would look semi-decent.

I would only recommend this recipe if you're master chef level or want a serious challenge. I don't think everything I went through was worth it in the end. I don't even know who ate the rest of it, my mom might've just thrown it in the trash when I wasn't looking 😢

Is there a recipe that you completely and utterly failed at making, like I did with this one? How did you try to fix it? 

Thanks for reading!

Ojakangas, Beatrice, and Roger LePage. Petite Sweets: Bite-Size Desserts to Satisfy Every Sweet Tooth. Portland, Me.: Sellers, 2009. Print.