Showing posts with label dessert. Show all posts

Monday, January 30, 2017

Making a Melon Sorbet!!

In the recipe book," Country Kitchen Collection: Fruit Basket" by Anna Nicholas. Today I decided to make a," Melon Sorbet" " (Nicholas 19). From the different diversity of recipes in the book, and the uniqueness throughout many of the different foods I could possibly create from the book, this one stood out to me, due to the fact that I love different kinds of melons and eat them on a daily basis. The book announces that," A sorbet is the perfect finish to a rich meal and has the advantage of being relatively low in calories. By its very nature a sorbet appears to intensify the flavour of delicate summer fruits and this version is no exception being deliciously and coolly refreshing. Obviously an ice cream maker would make life easier but it is quite possible to make sorbets and granitas - which have an interesting texture with larger crystals - without one.
    Sorbets, often made from a marc, which is a clear alcohol made from the pressings of grapes after winemaking  or other fruits, is often served in France between courses as a way of refreshing the palate and enabling the diner to more easily cope with a large and sumptuous meal" (Nicholas 19).

The Recipe consists of:
Reserving the outer rinds and discarding the seeds, spoon the flesh of 2 medium-sized honeydew or canteloupe melons into a food processor together with the juice of 2 lemons and 8 oz (2 cups) icing or confectioner's sugar. blend to a smooth puree and turn into an ice cream maker or freezer tray and freeze. Turn into the food processor for a second time and blend again lightly. Put back into the melon skins and re-freeze to use as required. 
   
This was the melon flesh I removed and used for my sorbet 


This is the final result of my melon sorbet served in a miniature dish 

    I really enjoyed making this enjoyable recipe, and also it was very delicious and would want to make it all of the time. It was very sweet and wasn't really a hard dish to make at all. This was a new experience for me because i have made smoothies but not really my own ice cream in the past so it was an interesting and scrumptious creation that I participated in. In my conclusion, the saying, "you just have to work harder for something better" isn't always true, what do you think?

Nicholas, Anna. "Pumpkin Pie." Fruit Basket. London: Grange, 1996. N. pag. Print.


Sunday, January 29, 2017

Ricotta Cranberry Custard

Hello! For my final blog post, I have chosen to make "Ricotta Cranberry Custard" from my book, Petite Sweets.

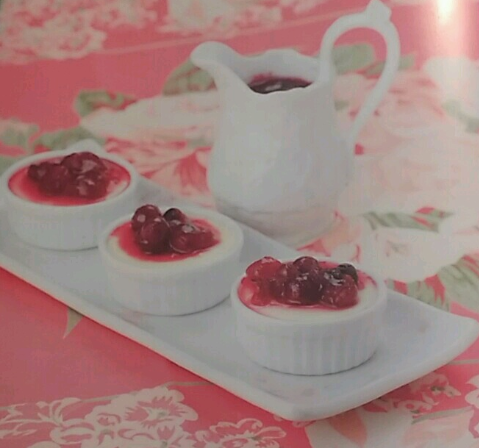
This recipe was chosen by my dad and older brother, Austin. I think my brother chose this because the picture from the book looks like cheesecake, and he loves cheesecake. But let me tell you, it's definitely not cheesecake. But we'll get to that later.

Ricotta Cranberry Custard from Petite Sweets (Ojakangas 98)
To start, I gathered the necessary ingredients: 

Custard: 
  • 12 ounces (1½ 8-ounce packages) cream cheese
  • ¾ cup ricotta cheese
  • 2 large eggs
  • ½ teaspoon pure vanilla extract
  • ½ cup sugar 
  • ½ cup heavy cream
Sauce: 
  • 2 cups fresh or frozen cranberries
  • 1 cup water
  • 1 cup sugar
First I preheated the oven to 250°F. Then I added the cream cheese to the electric mixer. 

But that's when I realized I only had one stick of cream cheese, instead of two, to complete the one AND one half ounces of cream cheese needed. 

Now that my whole recipe was off due to lack of one ingredient, I had to problem solve. I really wanted to get this done that day because the rest of the week I would be busy and I didn't want to put my mom in a bad mood by making her go all the way to the store just for one stick of cream cheese so, I did the only thing I could do. I adjusted the whole recipe. 
Since I only had 8 ounces of cream cheese instead of 12, I knew 8 divided by 12 was 2/3. That meant I would have to multiply my whole recipe by 2/3. 
So, I did. Except the eggs, which I just left at 2. 

Now that I was back on track, I started adding my ingredients to the electric mixer again; ricotta, eggs (one at a time), vanilla, sugar, and cream and mixed until combined (Ojakangas 99).

Once everything was smooth, I spooned the batter into two ramekins. After they were evenly divided among the two, I placed each one into a large, transparent baking dish. Then I poured "enough hot water into the baking [dish] around the ramekins to reach about halfway up the sides" (Ojakangas 99).
Carefully, I placed each baking dish with the ramekin inside into the oven and set it for 40 minutes. When 40 minutes had passed, I took them both out of the oven. "The top should not have changed color at all" (Ojakangas 99) and since it didn't, I knew I was on my way to making a successful dessert.
After they had cooled slightly, I wrapped both of the ramekins with saran wrap and placed them in the fridge, where they would stay and chill for about three hours. 

In the meantime, I started working on the sauce. Though, that didn't take long either. 
But I'm 90% sure I messed up the sauce too. My mom had gotten me a cranberry sauce can where all I had to do was heat it up and mix it around, but I didn't realize that so I put that in a pot and heated it up and mixed it around, as well as adding one cup of water and one cup of sugar. It came out fine though so nothing too problematic. 

So I wrapped that up like I did with the ramekins and placed it in the fridge where it would chill for three hours as well. 

When everything had chilled for three hours, I took it out of the fridge. 
And then I scooped the cranberries on top of the custard (I probably shouldn't have added so much cranberry to the first one).

What I learned from this experience is that custard ≠ cheesecake. I went into that first bite thinking something solid, but my spoon went through it like goo. Keep in mind that I hadn't really read the title of this recipe, I just saw the picture and went "ooh la la" and wanted to make it. I know what custard is... now. 

If I were to do this again, I'd probably try to find something better to do in those three hours where all I did was wait. Also, I would've made sure I had all my ingredients ahead of time.

I would recommend making this dessert if you have a lot of free time and like custard. Me? I don't like it so much. 

Have you ever tried a food that you thought would taste totally different based on it's looks? 

Thanks for reading!

Ojakangas, Beatrice, and Roger LePage. Petite Sweets: Bite-Size Desserts to Satisfy Every Sweet Tooth. Portland, Me.: Sellers, 2009. Print.

Chocolate Dipped Almond Biscotti

Hello! For this blog post I have chosen to make "Chocolate Dipped Almond Biscotti" from my book, Petite Sweets

This recipe was chosen by my mom because she loooves biscotti. She says it's perfect to eat in the morning with your coffee. I think it's just an excuse to eat some tasty dessert for breakfast. My mom also makes these around the Christmas time and dips the chocolate covered part into crushed candy canes for decoration (and taste).
Chocolate Dipped Almond Biscotti from Petite Sweets (Ojakangas 138)
 To make the Biscotti, I first had to gather all the ingredients I would need:

  • ½ cup sugar
  • 4 tablespoons (½ stick) butter, melted
  • 1 teaspoon pure almond extract
  • ½ cup almonds, chopped
  • 2 large eggs
  • 1 ¼ cups all-purpose flour
  • 1 ½ teaspoons baking powder
  • ¼ teaspoon salt
  • 1 cup semisweet chocolate chips

Before I started baking, I preheated the oven to 350°F. 
Then, using the electric mixer, I creamed the sugar, butter, and eggs until smooth (Ojakangas 139). Because my family isn't a huge almond fan, I left out the chopped almonds and also added a little less than the recommended amount of almond extract. When everything was smooth, I poured in the flour, baking powder, and salt. 

When everything was combined together, I split the dough in half and rolled out each half on a floured board. 
Once that was done, I transferred the dough onto a cookie sheet.
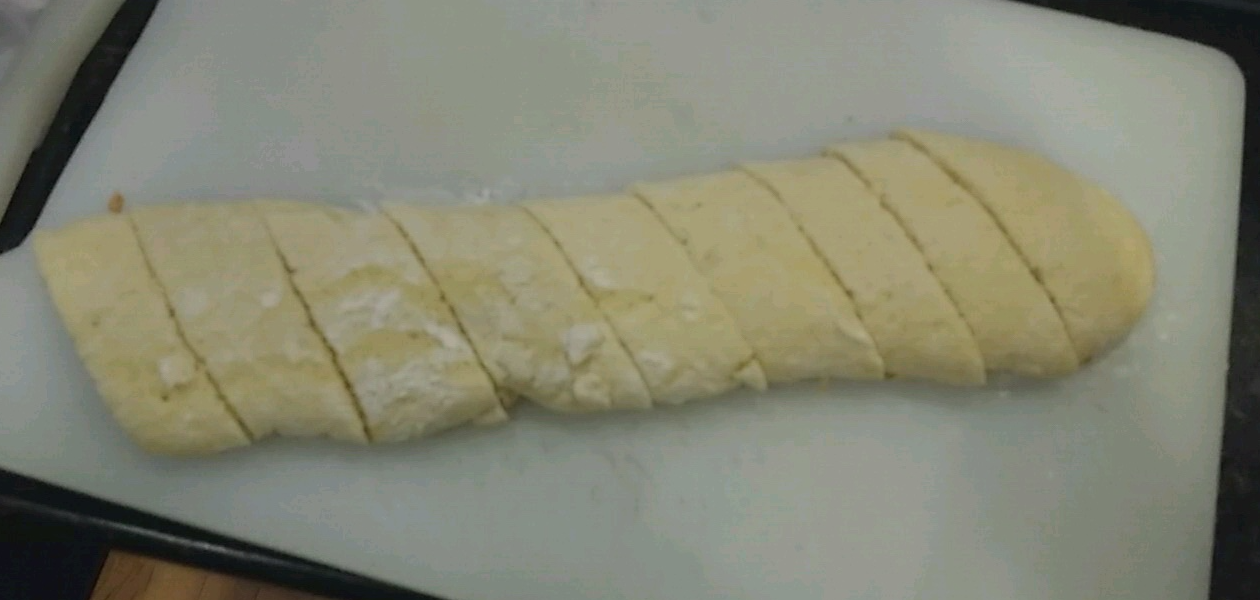
Then I baked the dough for 20-25 minutes. When it was firm, I "removed from the oven and let [it] cool slightly" (Ojakangas 139). Once it was cool enough for me to handle, I sliced both pieces of dough diagonally. 
 After slicing them, I evenly spread them out on the baking sheet and placed them back in the oven for 10 minutes.
 Then I took them out again, flipped each one, and placed it back in the oven for another 10 minutes, or until it was lightly browned and toasted (Ojakangas 139). 
Since the biscotti part was done, it was time to work on the chocolate dip. I took a small bowl, filled it with chocolate chips, and placed the bowl over boiling water. Every so often I stirred the chocolate chips until they started to melt and from there on I continued to stir them so they wouldn't burn on the bottom. 
When the chocolate was fully melted, I took each slice of the baked biscotti and dipped each one into the melted chocolate and voila! You have your biscotti.
If I were to do this recipe again, I would maybe think of a way to jazz it up, such as a decoration on top like my mom's crushed candy canes (but something different since I've already tried that) or maybe incorporating something into the dough like chocolate chips so you get them throughout the whole biscotti.

This recipe was a lot easier than my previous baking attempts, since I have perfected it by watching my mom in the past and getting her help during the process. I recommend this recipe if you want something good to go along with your coffee in the mornings. 

What recipes have you perfected? How did you perfect them? Did it take time and help?

Thanks for reading!

Ojakangas, Beatrice, and Roger LePage. Petite Sweets: Bite-Size Desserts to Satisfy Every Sweet Tooth. Portland, Me.: Sellers, 2009. Print.

Chocolate Dobos Torte Rolls

Hello! For this blog post I have chosen to make "Chocolate (Dobos Torte) Rolls" from my book, Petite Sweets
I made these on a day when I was bored and wanted to make something easy. Based on the amount of ingredients and how simple the final product looked in the book, I thought it would be something I could whip up really quick and enjoy. Unfortunately, things definitely did not turn out the way I had planned. This probably turned out to be one of the harder recipes I made.

Just so you know what I had planned on eating at the end of the day, here's an image from my book:
Chocolate (Dobos Torte) Rolls from Petite Sweets (Ojakangas 30)
Looks good, right? Now take a look at the ingredients:

Cake:
  • 2 large eggs, separated
  • ½ cup powdered sugar
  • ¼ cup all-purpose flour
  • 3 tablespoons milk 

Chocolate Filling:
  • 1 cup semisweet chocolate chips
  • 8 tablespoons (1 stick) butter, soft

These are all common baking items so of course I already had all of them in the pantry and fridge ready to go. To start, I turned on the oven to 375°F. Then, in an electric mixer, I beat the egg yolks (that I had already separated) and powdered sugar. Once the mixture was thick, I "beat in the flour and milk until [the] batter [was] smooth" (Ojakangas 31). Once completed, I folded the mixture into a bowl with beaten egg whites. 
When everything was smooth and folded together, I spread the batter evenly over the parchment paper (Ojakangas 31) that I had already laid out. 
I placed the batter in the oven for 5-6 minutes. 
I wish I had mixed the egg more so that it didn't show as much in the final product, but it was edible, so I continued on with the directions. 
Or, I would have, if I had actually been able to peel the cake away from the parchment paper. Me, being the bad reader that I am, totally skipped over the directions which clearly stated, "Coat [the parchment paper] with nonstick spray and dust lightly with flour" (Ojakangas 31). 

I love having to do everything all over again. 

So, after throwing out my first miserable attempt at these chocolate rolls, I started my second batch. 
I repeated the whole process, this time making sure to mix the batter well instead of just folding the ingredients together in the last part. Oh, and I also sprayed the paper with nonstick spray. 
When evenly dispersed on the parchment paper, this batter clearly had less egg whites that were unbeaten compared to the last one. But, of course, one mistake was not enough for me. I had to be an unbalanced klutz and therefore, I accidentally made my batter run all over the baking sheet as I was traveling to the oven, so it wasn't as proportionate as I would've liked. This disaster resulted in... 
Many, many uneven spots and burning. The bottom of the cake was fluffier, which I think was how the whole product was supposed to be, and the top part barely had any batter so, with the extensive time in the oven, it burned. 

But I wasn't about to throw away this disaster yet. I took my spatula and cut out all the burned parts. Then I poked at each side of the paper slightly, and got it to separate. Now I was one step further than I had gotten last time. 

Since the cake part was finished, I started on the chocolate filling. This was the simple part. I placed a bowl on top of a pot of boiling water and filled it with the butter and chocolate chips. I stirred the two together and continued to do so until they were melted together. 
With both the cake and filling done, I started to spread the chocolate onto the cake. I didn't think ahead, though, and ended up spreading it on the whole thing. This didn't work out because, since I cut out the burned part, when I finished off the recipe by rolling the cake, some of the chocolate part wasn't covered by cake, as you can see below. 
Obviously, the end product looks nothing like the picture in the book. It's not as fluffy and cake-like. To me, it looked more like a tortilla. I thought it would be more pound cake-ish.

If I were to do this again... well, I wouldn't. But I guess I would make sure not to burn my cake (and maybe try to make it look more like a cake?) so when I rolled it, it would look semi-decent.

I would only recommend this recipe if you're master chef level or want a serious challenge. I don't think everything I went through was worth it in the end. I don't even know who ate the rest of it, my mom might've just thrown it in the trash when I wasn't looking 😢

Is there a recipe that you completely and utterly failed at making, like I did with this one? How did you try to fix it? 

Thanks for reading!

Ojakangas, Beatrice, and Roger LePage. Petite Sweets: Bite-Size Desserts to Satisfy Every Sweet Tooth. Portland, Me.: Sellers, 2009. Print.

Thursday, January 19, 2017

Cupcakes in Blossom

     For my last go-around with these cupcakes, I want to try something a little different. So, I took on Karen Tack and Alan Richardson's version of a "Mother's Day" cupcake which are simply a bunch of flowers.


Ingredients include:

  • Vanilla Cupcakes
  • An Array of Colored Decorating Sugars
  • 1 Bag Flavored Mini Marshmallows (Assorted Pastel Colors)
  • 1 Bag Mini Marshmallows
  • 1 Can Vanilla Frosting
  • Pastel - Colored Licorice Pastels (Optional)

     This recipe was another quick, 3 step process that came out beautifully. To begin, you were to separate each color of decorating sugar into its own bowl. Next, to create the petals for each cupcake you must cut 22 like-colored marshmallows in half by the diagonal; allowing each of the pieces to fall in your desired color of sugar. You would then shake the bowl and press the cut side into the sprinkles to get coated. Next, a thin coat of frosting is spread along the cupcakes. Following this, you would place your petals first along the outside edge of the cupcake and slowly make your way towards the center (Tack and Richardson 138). To present these on Mother's Day, the authors suggest to, "Arrange  the flower cupcakes on a serving platter. [Buy and] trim green licorice twists to look like stems and place on the platter" (Tack and Richardson 138).

I personally really like the color scheme.

     Once again, a recipe for such great looking cupcakes doesn't get any easier, especially with the intricate help from the authors. As I said in an earlier post, even with the most basic skills needed to complete these cupcakes, Karen Tack and Alan Richardson are ready with their tips and tricks to help you, which is great when you strive for perfect cupcakes to present.


Since these are a Mother's Day - themed treat, I think I may have to make these come May 14th. Will You?

Tack, Karen and Alan Richardson. What's New, Cupcake?. New York, New York. Houghton Mifflin Harcourt Boston 2010.


Wednesday, January 11, 2017

Hungry Hungry Hippos

     Time for another cupcake recipe! This time, I've got my eyes set on these crazy simple (yet super adorable) hippos which are part of a whole jungle themed design by Karen Tack and Alan Richardson.


Ingredients include:
  • Vanilla Cupcakes
  • Blue Decorating Sugar
  • 1 Can Vanilla Frosting
  • Nutter Butters
  • Mini Chocolate Chips
  • Orange Froot Loops
     For these little guys, there are only 3 simple steps.

     First, you must "Place the blue sugar in a small shallow bowl" (Tack and Richardson 79). You are then to set aside some of the vanilla frosting into a ziplock bag and tint the rest of the icing into a deep shade of blue using food coloring. You must then spread this on top of the cupcakes and roll the edges in the blue sprinkles. Lastly, to form the hippo heads, you are to press a cookie into the frosting of each cupcake allowing one third of the cookie to hang over the edge, and use the bagged icing as glue to add the hippos chocolate and cereal features (Tack and Richardson 79). 

Hey, that's pretty good.


     Easy right? Nothing too crazy with these steps at all. To make matters even better, these authors have written tips to help you with almost every aspect of their recipes. For example, they can take you step by step on how to roll your cupcakes in decorating sugar, use a ziplock bag to pipe designs, or even just on how to frost a cupcake. All of these tips are created to help us, the students, achieve the best possible outcome, which is an aspect I've come to love about these authors and their book.


I made these hippos for my 1-1/2 year old cousin to enjoy. Who would you gift these cupcakes to?

Tack, Karen and Alan Richardson. What's New, Cupcake?. New York, New York. Houghton Mifflin Harcourt Boston 2010.

Tuesday, January 3, 2017

Koi Pond Cupcakes

     For my next cupcake attempt, I'm am to pursue the "Koi Pond" design by Karen Tack and Alan Richardson. These little confections are described as, "Koi goldfish made from circus peanuts which transform a simple platter of cupcakes into a golden pond" (Tack and Richardson 99).


Ingredients for these bad-boys includes:

  • Vanilla Cupcakes
  • 1 Can + a 1/2 Cup of Vanilla Frosting
  • Blue Food Coloring
  • Orange Circus Peanuts
  • Orange Peanut Butter M&M's
  • Orange Froot Loops
  • Brown Mini M&M's
     While going through this recipe, I was pleasantly surprised at how easy everything was. To begin, you were to place some of the vanilla frosting in a small ziplock bag and set it aside then tint the rest of the frosting with a few drops of blue food coloring and spread this on the cakes. You were then to cut the circus peanuts a variety of ways in order to create the bodies of the fishes, as well as their fins. After assembling the little guys on top of the cupcake, you were to use your set aside frosting as glue to create the fishes face out of M&M's and cereal (Tack and Richardson 99-101). These steps, of course, were far more intricate by the authors, which is great as it leaves little room for error.

     Once again, it was a great relief how simple these cupcakes were, as the only semi-difficult portion was filleting the circus peanuts due to their stiff and crumbly texture. According to the authors, you are to, "[for the fins] place the circus peanuts on their sides and cut lengthwise into two slices...lay each slice cut side down and cut each in half on the diagonal... for the bodies, place the remaining circus peanuts flat side down and make a diagonal cut from one end, moving no more than 1/4 inch..." (Tack and Richardson 99). Having the steps written out was great, however, for this portion of the recipe I found their visual on page 101 more useful as I was able to see exactly what shapes the authors wanted for myself to portray. 

They're a little ugly, but I'm pretty content.

After these cupcakes as well as my last polar bear sweets, I've become pretty keen to making animal-inspired cupcakes. So I ask; What animal would you like to see as a dessert?

Tack, Karen and Alan Richardson. What's New, Cupcake?. New York, New York. Houghton Mifflin Harcourt Boston 2010.

Saturday, December 31, 2016

Crispy Cream Puffs

Hello! For this blog post I have chosen to make "Crispy Cream Puffs" from my book, Petite Sweets. Just a heads up this recipe takes time to make and there are many parts to it, but it's something I would make again because it's so good.

Since I have to make at least five blog posts and, including me, there are five members in my family, I wanted to make something for each member of the family. The first recipe I made was chocolate velvet cupcakes, which was the recipe I chose to make for myself.

The next recipe was chosen by my little brother, Alex. He wanted me to make this recipe because when we were younger my mom used to make cream puffs for us and we would fill them with ice cream and eat them, so this would be like a recreation of that.
To make things a little more fun, I had help making these with my best friend, Hannah.

The end result was supposed to look a little something like this....
Crispy Cream Puffs from Petite Sweets (Ojakangas 126)
To create the cream puffs, I first had to get all the ingredients I would need:

Cream Puff:
  • 1 cup water
  • 8 tablespoons (1 stick) butter
  • ½ teaspoon salt
  • 1 ½ teaspoons sugar
  • 1 cup all-purpose flour
  • 4 large eggs

Cream Glaze:
  • 5 tablespoons butter
  • 2 cups powdered sugar
  • 1 ½ teaspoons pure vanilla extract 
  • 4-6 tablespoons hot water (I used 6)
  • ½ cup milk chocolate chips
  • 1-2 tablespoons chocolate sprinkles (for garnish- optional. I did not use this) 

The first thing I did was make the cream puffs. I started with preheating the oven to 425°F.
Then, in a saucepan I combined the water, butter, salt, and sugar. When it started to boil I took the pan off the stove, added the flour, and stirred it until "all the flour [was] incorporated" (Ojakangas 124). After, I placed it back onto the stove over low heat and stirred for "about 2 minutes to evaporate some of the moisture" (Ojakangas 124). When the dough was ready, I moved it from the saucepan to a mixer. Once I turned it on, I added all the eggs one at a time.

I then prepared the two baking sheets and lined them with parchment paper. I took a spoon and scooped 1 inch (in diameter) balls of dough from the mixer bowl and placed them so they were evenly spread out on the baking sheets (Ojakangas 124). When I finished, I placed the pans in the oven and set the timer for 15 minutes.

While the cream puffs were baking, I started making the glazes. To do this, I mixed the butter, powdered sugar, vanilla, and hot water in a bowl (we'll call this bowl #1). I would recommend not adding all the hot water at once because, if you do (like I did), the butter will not melt all the way and you'll need to place your bowl in the microwave for a couple seconds until the butter is melted to fully mix the ingredients.
Anyhow, I then took a saucepan, filled it with water, and set it on the stove over medium-high heat. I placed another bowl (bowl #2), which was full of chocolate chips, on top of that saucepan and started stirring the chocolate chips around in the bowl with a wooden spoon. When all of the chocolate chips were melted, I poured half of the mixture in bowl #1 into bowl #2 with all the melted chocolate chips and mixed those two together. 
As you can see, the white bowl (bowl #1) contains the first glaze and the black bowl hidden in the back (bowl #2) is filled with the glaze + melted chocolate chips. These will go on top of the cream puffs.
Speaking of cream puffs, after 15 minutes of baking in the oven, I reduced the temperature in the oven to 375°F and continued baking the cream puffs for another 10ish minutes. In the book it says 25 minutes, but my cream puffs were already browning so you may want to keep an eye on them to make sure they don't burn. 
After however many minutes, I took out the cream puffs and let them cool just enough so when I picked them up I wouldn't burn myself.
This next part got messy, so what I should've done was start by getting two large plates or cooling wracks (with paper towels underneath!!). Unfortunately, I'm not the kind of person to think ahead and I took out two cooling wracks with just my counter underneath. Let's just say I had a lot of cleaning up to do afterward and my mom was not happy about the mess. 
I picked up my first cream puff and dipped it into bowl #1, the original glaze. I placed the cream puff on the cooling wrack so the glaze could settle and continued this process until all cream puffs are covered. 

Side note using the glaze it totally optional. If you want, you could stop there, fill it, and eat it! But I think the glaze adds more flavor and it's veryyyy good.

When all the cream puffs were covered with the first glaze, I picked up a cream puff and dipped it into bowl #2 the chocolate glaze. I continued this process until all the cream puffs were covered with chocolate glaze. Again, this step is optional.

Finally, I took a cream puff, split it in the middle, and filled it with ice cream. Many people fill it with pudding, custard, or etc. but my favorite is ice cream. At the moment all I had was Cookies and Cream, but anything's good with these! 😍 
If I were to do this again, I would definitely try to clean up along the way and try not make a total disaster of the kitchen. I might even try making the "Fruit Filled Cream Puffs" (Ojakangas 125), which is the same recipe for the cream puffs but a suggested ricotta and fruit filling. 

I would highly recommend making these if you're ever hungry and/or want a tasty dessert. Although they didn't look as good as the picture in my book did, they tasted amazing! 
And this time my dad didn't get to eat them before I was done, but he sure did ask me when they would be done a lot. 

Is there a recipe that you make a lot that brings back old memories? 
Or is there something you like doing with your best friend that makes time seem to fly by? My best friend helped me along the way and made the wait and hard work for preparing these a lot easier and more enjoyable 🙂 

Thanks for reading!

Ojakangas, Beatrice, and Roger LePage. Petite Sweets: Bite-Size Desserts to Satisfy Every Sweet Tooth. Portland, Me.: Sellers, 2009. Print.

Wednesday, November 30, 2016

What's New, Cupcake?

Cupcakes are a classic, sweet delight which many have come to know and love. Within the book "What's New, Cupcake?" by Karen Tack and Alan Richardson, these treats have been taken to a whole new creative and tactical level which I've set out to achieve this quarter.


To begin this journey, I've set my sights on these adorable confections called "Frosty Mugs". 


Ingredients Include:


  • Chocolate cupcakes baked in silver foil liners.
  • White decorating sugar.
  • Thin (chocolate) cookies.
  • Orange candy slices.
  • Vanilla frosting.
  • Green food coloring.
  • Chocolate chips.
  • Mini chocolate chips.
  • Small red candies.

    After baking the cupcakes, the snowmen were decorated with: a snowy complexion using course sprinkles over frosting, a face by the help of chocolate chips, a faux carrot nose using orange candy slices, and a chocolate-cookie hat with a sprig of holly (Tack and Richardson 200).

    This may sound simple, however, in order to create a neat finished product, there were tedious steps involved in decorating the cakes. For example, in coating the cupcakes you are to, "Place the material in a shallow bowl large enough to accommodate the cupcake. [Then] hold the bowl at an angle and lightly press the frosting.... into the coating material to coat and shape the entire surface" (Tack and Richardson 17). Though the intricate detail the authors put forth in their text may seem like "too much", I found myself being thankful for this: it leaves less room for error. After following this step, I guess you could say I had clean and perfectly coated cupcakes.


These guys may not have ended up perfect, but I'm pretty happy with them.

    In the introduction of this book, the authors reminisce on a turning point within their culinary career. They ended their tale of recreating van Gogh's "Starry Night" on a canvas of cupcakes with their peers reaction to their masterpiece; "they said we were as looney as van Gogh himself" (1). This made myself wonder; how did this duo push beyond what others think in order to express themselves to the fullest whilst doing what they love?

So I ask you: what makes you push past what others think to fulfill your ambition?

Tack, Karen and Alan Richardson. What's New, Cupcake?. New York, New York. Houghton Mifflin Harcourt Boston 2010.


Making a Pumpkin Pie!!! :)

  In the recipe book," Country Kitchen Collection: Fruit Basket" by Anna Nicholas, has a wide variety of different recipe to make and try. There were some other options I was thinking of doing, but I ended  up making the decision to make the "Pumpkin Pie." This recipe states that," this dish is always connected with the United States and is regarded as being so American, like the Thanksgiving turkey, that it is almost a national dish."
This a picture of my product in an oven that is baked and done 

The recipe from the book is the following:
  You will need sufficient flaky pastry, either bought or made in the usual way, to line a 9-inch (23cm) flan tin. Either way, it must be well chilled right up to the last minute you need to use it. Halve a 3-lb pumpkin and remove the strings and seeds. Place cut sides down on a baking sheet and bake in a moderate oven until the flesh is soft (1 hour). Remove the cooked pumpkin from the oven and turn up the temperature to 400 degrees F. Puree the pulp in a sieve or blender and combine 3/4 pint of it with 5 oz brown sugar, 1 teaspoon ground cinnamon, a half-teaspoon each of ground ginger and salt and 1/8 teaspoon each of nutmeg and cloves. Mix thoroughly and incorporate 12 fl oz double cream and 3 tablespoons of rum. Line the flan tin with the pastry and pour the mixture into it. Bake for about 45 minutes or until a knife comes out clean when inserted into the pie, Serve either chilled or at room temperature, on its own or topped with lightly whipped cream. 
This is the end product with a piece on a plate

This recipe involves actually using a pumpkin and cooking it for the pie, and I don't usually make pumpkin pie, but I've had it beforehand and wouldn't think an actual pumpkin flesh was used in the process, so i learned something new and made something delicious! Do you think that experiencing new ideas and things can make a major impact on our lives??

Nicholas, Anna. "Pumpkin Pie." Fruit Basket. London: Grange, 1996. N. pag. Print.