Showing posts with label Baking. Show all posts

Monday, January 30, 2017

Cupcake Ghosts


Bring a dessert to life with a simple technique from Karen Tack and Alan Richardson! In the book What’s New, Cupcake? Both of the authors implement a series of simple, plain, and unique alterations to cupcakes. With this dessert, I can emulate a finished piece, one that is creative and very easy.

These are the ingredients that I used:
1 can (16 ounces) chocolate frosting
2 containers (8 ounces each) frozen whipped topping, thawed in refrigerator
24 1 ½ - inch balls of ice cream (any flavor)
Multicolored candy-coated chocolate-covered sunflower seeds or chocolates
(Tack and Richardson 157).

I began this dish by prepping the cupcakes. I mixed the batter in with 3 eggs, a cup of water, and half a cup of oil. Then, after a few minutes of mixing, I placed it in the oven set to 325 degrees. After a set amount of time has passed, I had the cupcakes fresh and ready.


I began to approach the dish by carving out a spherical shape from the cupcake, not too far from the edges. Tack and Richardson suggested to sprinkle grounded cookies on top of the cupcake, but I decided to take a different route. I excluded that step, and, instead, I went on to filling the hollow portion of the cupcake with a small scoop of ice cream.
At this point, there were only a few more steps to put the final piece of the ghost together. I then coated the cupcake in a swirl-like fashion. As Tack and Richardson suggested, “Pipe a circle of the whipped topping around the base of the cone cake. Pipe a smaller circle on top of the ice cream and the whipped topping to cover the cake, then pipe a third layer of whipped topping, using a squeeze-release-pull motion” (157). This overall created a ghostly effect; the stacked swirls represent an animated outlook of how ghosts are shaped. At the end of this method, I peaked at the very uppermost portion to signify a ghost-like head.


I finished off the dessert by placing two sunflower seeds just below the very top of the frosted twirls to depict eyes. The finished piece was generally very simplistic, yet incorporates different flavors to achieve a desired effect both flavorfully and creatively. Through making this dish, I’m curious as to how else you can transform dishes like these. How do you bring your desserts to life?

Tack, Karen and Alan Richardson. What’s New, Cupcake? New York, New York. Houghton Mifflin Harcourt Boston 2010

The Super Fun Lemon Milk Drink with Alex 😔: Sour Power

I'm not sure entirely why I decided to put lemon and milk together but if this book hasn't brought me fantastically delicious natural snacks as advertised, I would've never. After my 1 am trip to the grocery store for the ingredients I'll need for the next three rapid-fire posts, I was ready to get lemony fresh and also milky fresh I guess. Jill Pinkwater didn't give a little detail or fun caption to this recipe so in the passage for the "Beverages" section, she says, "Unfortunately, with the exception of dietetic drinks, that are loaded with chemicals, all flavored sodas and most fruit drinks available are full of sugar" (Pinkwater 41). The sentence still holds true today and nothing really gets more straightforward and healthy with said ingredients:

1 tbs. of lemon juice
1 tbs. of honey
1 cup of ice cold milk

Surprising I got all those things and set them up super nice:

Wow I got it all!

We also need the basics of a bowl, a mixer, and some measuring utensils of course. To get started, I threw (and dripped for the honey) into the bowl as delicately shown here:

I hate how slow honey drips

Next I mixed the ingredients until it's fluffy as the book calls for. My whipping skills are obsolete these days to it was a matter of no time until my beautiful milky lemony drink was ready:

I can't wait...

Mmm tasty mmm mmm. I poured it into a measuring cup and then a cup (because bowls are hard to pour into a cup) and took a sip. Can you guess how amazing this foam tasted!?!?!? It scars my taste buds to this day. I had my father (the only one brave enough to say yes) try it and he promptly said drank a Powerade afterwards. Shows just how exhilarating and pumped you can get off such a refreshing drink. One thing I took away from this experience is how if a product doesn't sound good, it probably isn't good. Another things is that the drink is more concentrated than the foam it also has so in my next drink I made, I took that into consideration and it was a lot better. Luckily, my next blog will tell you all about that drink! See you next time fellers and don't forget to bring mouthwash.

The final product

Question: How much honey does it take for you before things actually start tasting better/sweeter than before? 

Pinkwater, Jill. The Natural Snack Cookbook: 151 Good Things to Eat. New York: Four Winds,   
    1975. Print.

Minty Fresh Ice Cream

For my final blog, I will be making Sally McKenney's Mint Chocolate Chip Ice Cream Cupcakes. These treats are perfect for hot days and ice cream cravings. Personally, I don't like plain cupcakes. They are too bready and do not sit well on my taste buds, but I love ice cream cake. Sally says, "There is nothing quite like a giant waffle cone filled with mint chocolate chip ice cream on a hot sunny day" (McKenney 135).

In order to complete this recipe you will need:

  • 10 Oreos, crushed into crumbs
  • 2 tbsp of butter, melted
  • 1x8oz container frozen whipped topping thawed
  • 1-quart mint chocolate chip ice cream, softened
  • 4oz (225g) coarsely chopped semi-sweet chocolate, such as Baker's brand
  • 3/4 cup (30g) whipped cream
Preparation time for the dessert should take 15 minutes. This recipe will take at least four hours to complete. This will make 12 cupcakes, but because there are only nine cupcake holders available I made nine cupcakes.

Recipe:

  1. Line a 12-count muffin pan with cupcake liners. Set aside.
  2. Make the Crust: Combine the crushed Oreos and melted butter in a medium bowl. Divide between 12 cupcake liners (Nine for my demonstration) and press evenly into the bottom of each. Set aside. 
  3. Make the Filling: In a large bowl, stir the frozen whipped topping and ice cream together until softened and combined evenly. Spoon the mixture evenly into the cupcake liners. Freeze for at least four hours or until firm.


  4. Make the Topping: Right before removing cupcakes from the freezer. melt the semi-sweet chocolate in a small ball in the microwave in 20-second increments, stirring after each increment until smooth. 

  5. Remove the cupcakes from the freezer and drizzle melted chocolate over each. 
  6. Top each cupcake with 1 tablespoon of whipped cream. 
  7. Enjoy!
This dessert is best served right after whipped cream is applied. Sally Mckenney says, "The chocolate-drizzled cupcakes may be made 1 day in advance and garnished with whipped cream immediately before serving" (McKenney 135).

These were absolutely exceptional! By far, this is my favorite tasting dish. This recipe was fairly easy to make. The only downside is that it does require time to freeze, but it is definitely worth the wait. 
Do you enjoy ice cream? If you do what is your favorite flavor? If not what treat do you enjoy during hot days.

Thanks for reading!

McKenney, Sally. Sally's Baking Addiction: Irresistible Cookies, Cupcakes, & Desserts for Your Sweet-tooth Fix. New York, NY: Race Point, 2014. Print.

Cupcake Ducks


Remodel the world-known cupcake through a series of shapes and design!

Ingredients:
24 vanilla cupcakes baked in yellow paper liners
2 cans plus 1 cup vanilla frosting
Yellow food coloring
12 marshmallows
20 plain doughnut holes
14 orange fruit chews
48 brown mini candy-coated chocolates (M&M’s Minis)
(Tack and Richardson 129).
Cupcakes are usually uniform in its creation, but I decided to utilize variances of forms to create a duck replica. To prep the dish, I began to prepare all the individual parts. I began with the duck’s tail; shaping the spongy piece with both ease and difficulty. In Karen Tack and Alan Richardson’s example, the marshmallow is displayed so it angles like a tail of a duck. For stabilization purposes, I used two toothpicks to connect both the modified marshmallow and doughnut hole to the cupcake.

Following those steps, I got 6-7 tablespoons of frosting and added multiple drops of yellow food coloring in to a bowel. Mixing the paste eventually gave a nice, yellow hue. However, without having the proper tools, I had to figure out a way to dip it into the frosting. After I had the duck structured the way I wanted it, I coated it in the finished frosting look. According to Tack and Richardson, they suggested, “Holding the cupcake by its paper bottom, dip it into the yellow frosting just up to the liner” (131).
Finally, I added the brown coated chocolates to play as the eyes and placed it on the doughnut hole structure. Then, I used the orange fruit chews to act as the beak of the duck. Cutting them in half, I was then able to get the desired size. I flattened the pieces and bent it at an angle where it would resemble an open beak (131). Securing it onto the cupcake was a challenge, but eventually it was pinned in place with delicate pressure.
Creating this dish was a bit of a struggle but was overall had complementary pieces that sufficed. Manipulating the shapes offered a different take on making cupcakes, something I’d usually make with much more ease. Throughout making this dessert I began to wonder: What difficulty do you add to your hobbies?
Tack, Karen and Alan Richardson. What’s New, Cupcake? New York, New York. Houghton Mifflin Harcourt Boston 2010

Sunday, January 29, 2017

Scandinavian Holiday Recipes- Spritz

Spritz

Spritz cookies are a small sugary cookie that are very sweet and soft.  You can make them in different shapes and decorate them in many different ways. They are very yummy and a perfect holiday treat.

Ingredients:

  • 1 1/2 cups butter
  • 2 1/4 cups sugar
  • 2 eggs, beaten
  • 1 1/2 teaspoons vanilla
  • 3 1/2 cups flour

Recipe:

"Cream butter and sugar. Add remaining ingredients and beat until smooth. Place dough in a cookie press and press out onto a grease baking sheet in the shape of small wreaths. Bake at 325 degrees for about 10 minutes or until golden brown. Sprinkle with colored sugar." (Spencer 150).


Results:

Very good!  The cookie press was a learn as you go process because I had to redo a lot. I didn't find the directions to the press until after making them, but oh well.  They still turned out good and it made a lot.  My decorations were red and green sprinkles and my shape I chose was a Christmas tree, because I made them in December. But why do you think a lot of recipes are a learn as you go/ learn from your mistakes processes?

Bibliography:

Spencer, Michelle Nagle., and Miriam Canter. Scandinavian Holiday Recipes: Norway, Sweden, Denmark, Finland, & Iceland. IA City, IA: Penfield, 1989. Print

Scandinavian Holiday Recipes- Gingersnaps

Gingersnaps

I'm pretty sure we all know what gingersnaps are so I'm not going to explain much about them.  But basically, they are a hard cookie that taste like ginger and many other spices.

Ingredients:
  • 2/3 cup butter
  • 1 cup sugar
  • 4 tablespoons sorghum
  • 1 egg
  • 1 cup flour
  • 2 teaspoon baking soda
  • 1/4 teaspoon salt
  • 1/2 ground cloves
  • 1 teaspoon ground cinnamon
  • 1 teaspoon ground ginger
  • sugar for rolling
Recipe:

"Cream butter and sugar. Add sorghum and egg. Sift together dry ingredients; add to butter mixture. Chill at least 3 hours or overnight. Roll into 1-inch balls and then roll in sugar. Place on an ungreased cookie sheet. Bake at 375 degrees about 10 to 12 minutes or until lightly browned. Makes about 2 dozen." (Spencer 156).


Results:

Nothing. They turned out horribly. they resembled nothing like a cookie either.  I replaced sorghum with molasses because the internet said it was okay to.  Clearly it wasn't!  I'm no pro. but something had to be wrong with what I did.  I don't know why it didn't turn out but I know I'm never making that recipe again.  And in case your wondering, I do not recommend it.  But I would like to know, why do recipes not turn out they way they should, even if you do the right replacement methods and measurements?

Bibliography:

Spencer, Michelle Nagle., and Miriam Canter. Scandinavian Holiday Recipes: Norway, Sweden, Denmark, Finland, & Iceland. IA City, IA: Penfield, 1989. Print


Chocolate Dipped Almond Biscotti

Hello! For this blog post I have chosen to make "Chocolate Dipped Almond Biscotti" from my book, Petite Sweets. 

This recipe was chosen by my mom because she loooves biscotti. She says it's perfect to eat in the morning with your coffee. I think it's just an excuse to eat some tasty dessert for breakfast. My mom also makes these around the Christmas time and dips the chocolate covered part into crushed candy canes for decoration (and taste).
Chocolate Dipped Almond Biscotti from Petite Sweets (Ojakangas 138)
 To make the Biscotti, I first had to gather all the ingredients I would need:

  • ½ cup sugar
  • 4 tablespoons (½ stick) butter, melted
  • 1 teaspoon pure almond extract
  • ½ cup almonds, chopped
  • 2 large eggs
  • 1 ¼ cups all-purpose flour
  • 1 ½ teaspoons baking powder
  • ¼ teaspoon salt
  • 1 cup semisweet chocolate chips

Before I started baking, I preheated the oven to 350°F. 
Then, using the electric mixer, I creamed the sugar, butter, and eggs until smooth (Ojakangas 139). Because my family isn't a huge almond fan, I left out the chopped almonds and also added a little less than the recommended amount of almond extract. When everything was smooth, I poured in the flour, baking powder, and salt. 

When everything was combined together, I split the dough in half and rolled out each half on a floured board. 
Once that was done, I transferred the dough onto a cookie sheet.
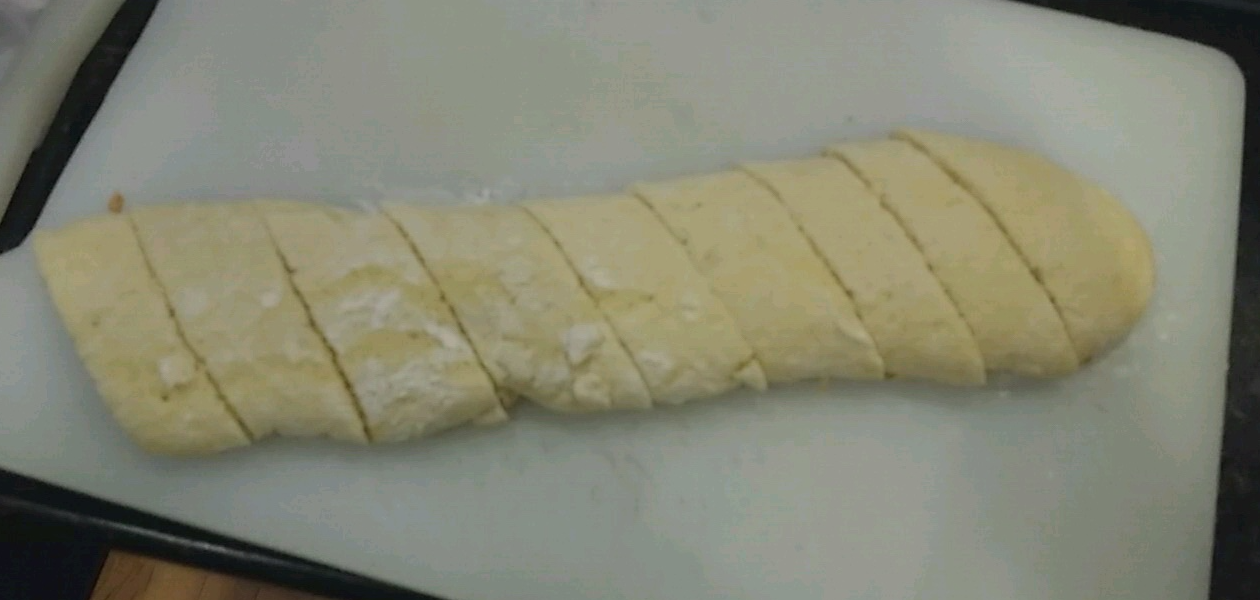
Then I baked the dough for 20-25 minutes. When it was firm, I "removed from the oven and let [it] cool slightly" (Ojakangas 139). Once it was cool enough for me to handle, I sliced both pieces of dough diagonally. 
 After slicing them, I evenly spread them out on the baking sheet and placed them back in the oven for 10 minutes.
 Then I took them out again, flipped each one, and placed it back in the oven for another 10 minutes, or until it was lightly browned and toasted (Ojakangas 139). 
Since the biscotti part was done, it was time to work on the chocolate dip. I took a small bowl, filled it with chocolate chips, and placed the bowl over boiling water. Every so often I stirred the chocolate chips until they started to melt and from there on I continued to stir them so they wouldn't burn on the bottom. 
When the chocolate was fully melted, I took each slice of the baked biscotti and dipped each one into the melted chocolate and voila! You have your biscotti.
If I were to do this recipe again, I would maybe think of a way to jazz it up, such as a decoration on top like my mom's crushed candy canes (but something different since I've already tried that) or maybe incorporating something into the dough like chocolate chips so you get them throughout the whole biscotti.

This recipe was a lot easier than my previous baking attempts, since I have perfected it by watching my mom in the past and getting her help during the process. I recommend this recipe if you want something good to go along with your coffee in the mornings. 

What recipes have you perfected? How did you perfect them? Did it take time and help?

Thanks for reading!

Ojakangas, Beatrice, and Roger LePage. Petite Sweets: Bite-Size Desserts to Satisfy Every Sweet Tooth. Portland, Me.: Sellers, 2009. Print.

Scandinavian Holiday Recipies- Lefse

Lefse

Lefse is a Norwegian Dessert that is like a "potato tortilla."  Lefse making is a holiday tradition in my family that we have every year. It is a long process to make but it makes a lot and is really delicious.


Ingredients:
  • 5 well-packed cups of cooked riced potatoes
  • 1/2 cup margarine
  • 3 tablespoons powered sugar
  • 2 cups flour
  • 1 teaspoon salt
Recipe:

"Add margarine to potatoes while they are still warm. Cool to room temperature. Add powdered sugar, flour, and salt. Knead well and then roll into a log. Cut and measure into 1/3 cup portions, make a round ball of each.  On a floured lefse "board" press each dough ball down and then, using a pastry sleeve and rolling pin, roll into 14-inch circles to fit a lefse griddle. The secret to making lefse is the use of a lefse stick. For the last roll across the dough use a grooved lefse rolling pin, which marks the dough and makes it thinner. Grill dough on a lefse griddle for about 1 to 2 minutes on each side. Fold each lefse in half or quarters. Cool between towels and store in plastic bags." (Spencer 86).


The Results:

Delicious as always!  They turn out great every year and I highly recommend making them.  There are never any struggles for me when it comes to making them because I know the steps of making it and I make it so often. They are best served with butter and sugar rolled up, but it is also good plain. Lefse making is one of the big things I look forward to during the holidays.

Bibliography:
Spencer, Michelle Nagle., and Miriam Canter. Scandinavian Holiday Recipes: Norway, Sweden, Denmark, Finland, & Iceland. IA City, IA: Penfield, 1989. Print


Back at it again with cookies! Part 3! :D

Oatmeal chip cookies

Okay I know what you're thinking. Oatmeal cookies? Gross. *SMACK* DON'T JUDGE A BOOK BY IT'S COVER, because these cookies are just as tasty as any other cookie.

For this recipe you'll need:
1 cup of butter, or two sticks of butter
1 cup of sugar
1 cup packed brown sugar
2 eggs
1 teaspoon vanilla extract
2 cups all-purpose flour
1 teaspoon baking soda
1/2 teaspoon baking powder
1/2 teaspoon salt
2 cups oats
2 cups (or however much you want to add) of chocolate chips

"When our house was for sale, I made a batch of these cookies just before a showing. Not only did the people buy the house, they requested the recipe!" (Fridirici 548)

Step 1: Cream the butter and the sugars together until well combined. 

Step 2: Mix in the eggs and vanilla into the mixture.

Step 3: Sift the flour, baking soda, baking powder, and salt.

Step 4: Add the dry ingredients to the wet mixture and stir until well combined. 

Step 5: Mix in the oats and the chocolate chips

Step 6: Preheat the oven to 350 degrees Fahrenheit and bake for 11-12 minutes or until the edges become golden brown.

These cookies were really simple, and they were extremely scrumptious. These cookies did not rise as much as the other cookies I've made, but they did expand and flatten out. Like the other post, I made 12 cookies in a muffin tray, just to see if it works the same or if it would be a complete bust. Surprisingly, it worked and I made over 30 cookies with the muffin cookies. Now, these aren't the chip off the block cookies. They are light, and have just the right amount of sweetness to them that makes it a good cookie in my book.

(Final product, total count: 30+ cookies)

My question for you guys is this: Have you ever made food to share with others? I ask this because I didn't see this recipe made around 4 dozen cookies... but in my book it's worth making more because you can share the food you made! 

Fridirici, Nancy. “Cookies and Bars.” The Taste of Home Cookbook: from the World's #1 Cooking Magazine, Reiman Media Group, Greendale, WI, 2010.


Monday, January 23, 2017

Pastissets

Pastissets

In English, the Spanish word pastissets translates to powdered sugar cookies. They are made with cinnamon and lemon flavors, which the book describes as "hard to resist." These cookies are incredibly easy to make and only took about an hour total.
You start by beating together some butter, sugar, egg yolk, and lemon peel. I didn't have any fresh lemons, so I just used lemon juice. However, I wouldn't recommend this because you had to use about 3 cups of lemon juice for the flavor to really get through.
Then, you add some cinnamon and flour to the dough and mix until it is thick. After this, you place the dough in a pan and bake for 10 minutes. The recipe calls for cookie cutters, but I just balled my dough and made circular cookies.
the cookies before they were baked

Here's the recipe so you can make it yourself!

                              2/3 cup vegetable shortening or     1/2 teaspoon grated lemon peel
                              unsalted butter, softened                1/4 teaspoon cinnamon
                              1/2 cup unsalted butter                   1 egg yolk
                              1/2 cup sugar                                  sifted confectioner's sugar

With a wooden spoon, beat together the vegetable shortening and the butter, then incorporate the sugar, egg yolk, and lemon peel. Combine the cinnamon and flour in working with your hand to form a smooth dough.
On a floured surface, roll the dough a scant 1/4 inch thick, and cut with a 1-inch scalloped cookie cutter. Arrange the cookies on a greased cookie sheet and bake at 350○ F about 10 minutes, or until golden. Cool, then coat with confectioner's sugar.
finished lemon cookies
What are some fun and interesting twists you could make to this recipe?

Casas, Penelope. New York: Knopf Doubleday Group, 1996. Print. 

M&M Cookies

Chocolate chip cookies is a standard food that is appreciated all across the world. Sally McKenney quotes, "The chocolate chip cookie is one of our household favorites. It's timeless classic, an iconic dessert staple, and an unbeatable comfort food" (McKenney 110).

Why not throw a twist into this timeless classic? This recipe will combine the sweet chocolate candy M&Ms to these cookies.

When cooking cookies Sally reminds us, "The melted butter and extra egg yolk make the cookies extra chewy, but don't forget to chill the dough; it's the most important step" (McKenney 110).

To accomplish making these delicious confections you need:

  • 2 1/4 cups (280g) all-purpose flour 
  • 1 tsp baking soda
  • 1 1/2 tsp cornstarch
  • 1/2 tsp salt
  • 3/4 cup (1.5 sticks or 170g)  butter, melted
  • 3/4 cup (150g) light brown sugar
  • 1/2 (100g) granulated sugar
  • 1 large egg, plus 1 egg yolk
  • 2 tsp vanilla extract
  • 1/2 cup (90g) semi-sweet chocolate chips
  • 1/2 cup (85g) plain M&Ms
The time to prepare all necassary supplies will take about 15 minutes, and take two hoursto complete. This recipe makes 16 large cookies.

Recipe:

  1. Whisk the flour, baking soda, cornstarch, and salt together in a large bowl. Set aside.
  2. In a medium bowl, whisk the melted butter, brown sugar, and granulated sugar untl no sugar lumps remain. Whisk in the egg, then the egg yolk , followed by the vanilla.
  3. Pour the wet ingredients into the dry ingredients and mix together with a large spoon or rubber spatula.
  4. Fold in the chocolate chips and M&Ms.

  5. Cover the dough and chill for at least 2 hours (or up to 3 days).
  6. Take the dough out of the refrigerator and allow to soften slightly at room temperature for 10 minutes.
  7. Preheat the oven to 325 degrees farenheit. Line two large cookie sheets with parchment paper or silicone baking mats.
  8. Roll the dough into balls, about 3 tablespoons of dough is crumbly, the warmth of your hand will help it come together in a ball. Roll the cookie dough balls to be taller rather than wide. Place 8 balls of dough three inches apart onto each cookie sheet.
  9. Bake each batch for 11-12 minutes. The cookies will look very soft and underbaked. Remove from the oven and allow the cookie sheet to cool for 10 minutes before moving to a wire rack to cool completely. The cookies will stay fresh in an atright container at room temperature for up to 10 days.
  10. Enjoy!
The cookies came out very soft like instructions quoted. I discovered that if you like crisper and crunchier cookie just put these cookies in the fridge.

The only difficulty in this process was mixing the dough. The instructions did not say that the dough would be very difficult to mix with the chocolate and M&Ms, so to improvise, I used my hands to mix. 

What is your favorite candy? Could that candy be easily incorparated with baking or cooking? Why or why not?

Thanks for reading!

McKenney, Sally. Sally's Baking Addiction: Irresistible Cookies, Cupcakes, & Desserts for Your 
Sweet-tooth Fix. New York, NY: Race Point, 2014. Print.

Sunday, January 22, 2017

Making swirled gingerbread cream cheese bars!!

I decided to try something that I've never made before and use a gingerbread recipe. I used this recipe from Cookies to Die For! by Bev Shaffer that utilizes two layers of cream cheese flavor and one solid large layer of gingerbread that combined great! I would highly recommend this recipe to a friend, especially since many of mine enjoyed it.
"Ingredients
  • 1 1/4 cups unbleached, all-purpose flour
  • 2 1/2 tsp. ground ginger
  • 1 1/2 tsp. ground cinnamon
  • 1/4 tsp. baking soda
  • 1/4 tsp. salt
  • 3/4 cup unsalted butter, room temperature, plus additional, melted, for brushing foil
  • 1 1/4 cups granulated sugar
  • 1 large egg
  • 1/3 molasses
  • 8 oz. cream cheese, room temperature
  • 2 tsp pure vanilla extract
Heat oven to 350 degrees. Line a 13x9" baking pan with foil. Lightly brush foil with melted butter.


In a small bowl, mix together the flour, ginger, cinnamon, baking soda, and salt.


Using an electric mixer, in a large bowl, beat the butter with 3/4 cup of granulated sugar until light and fluffy. Scrape down sides and bottom of bowl.


Beat in egg until well blended. Mix in flour mixtures until combined. Scrape down sides and bottom of bowl


Stir in molasses and 3 tbsp. water just until blended. Do not overmix.


Gently spread into prepared pan.


Using an electric mixer, in a medium bowl, beat cream cheese until smooth. Beat in remaining 1/2 cup of the granulated sugar and the vanilla. Scrape down sides and bottom of bowl.


Reserve 1/2 cup of the frosting; cover and refrigerate remaining frosting until ready to use. Spoon teaspoonful dollops of the reserved 1/2 cup of frosting over the gingerbread batter in pan. With knife or spatula, ever so gently swirl frosting throughout the batter to marbleize.


Bake for 28 to 35 minutes or until a toothpick inserted in center comes out clean. Cool in pan on a wire rack for 15 minutes. Carefully lift out of pan using foil. Cool completely on a wire rack.


Invert and gently peel off foil. Invert again so bottom is down, then spread refrigerated frosting over gingerbread. Cut into bars, makes about two dozen" (Shaffer 164).


This recipe was troublesome occasionally, when it required careful spreading of the cream cheese upon the gingerbread batter. But, it was completely worth it for the flavor. This was likely one of the recipes that took a longer time, especially with all of the baking and cooling time, but I had time to spare so it wasn't an issue. Just don't expect to be done with this recipe within an hour.
 While I enjoyed the end results, I did make a mistake that likely was damaging to the flavor cream cheese. In the recipe it says to reserve 1/2 cup of frosting to put on before baking (Shaffer 164). I misread the recipe, I think because it uses the word reserve I assumed it meant to save for later, not the other way around. This put more frosting on the gingerbread before baking, and not on the other side of the bars which would likely have given a stronger cream cheese flavor, which I think was weak.
As much as I liked the results of the bars, and how many people enjoyed them, I think they could've been better. In my opinion, the gingerbread to cream cheese ratio was not exactly where it should've been. Other than that mishap, I think all of the flavors were great and many people agreed with this.

In the future, if I ever do try this recipe again, I might change things with the cream cheese. Since I don't think there is anything I could do differently with the gingerbread and cream cheese flavors themselves, I think proportions is what I could work on. I could either follow the recipe for once in my life, or I could make more cream cheese than prescribed by multiplying all of the measurements by 5/4 or 3/2.

Do you think I should change the cream cheese frosting at all? How so?
Shaffer, Bev. Cookies to Die For! Gretna, LA: Pelican Pub., 2009. Print.


Thursday, January 19, 2017

Cupcakes in Blossom

     For my last go-around with these cupcakes, I want to try something a little different. So, I took on Karen Tack and Alan Richardson's version of a "Mother's Day" cupcake which are simply a bunch of flowers.


Ingredients include:

  • Vanilla Cupcakes
  • An Array of Colored Decorating Sugars
  • 1 Bag Flavored Mini Marshmallows (Assorted Pastel Colors)
  • 1 Bag Mini Marshmallows
  • 1 Can Vanilla Frosting
  • Pastel - Colored Licorice Pastels (Optional)

     This recipe was another quick, 3 step process that came out beautifully. To begin, you were to separate each color of decorating sugar into its own bowl. Next, to create the petals for each cupcake you must cut 22 like-colored marshmallows in half by the diagonal; allowing each of the pieces to fall in your desired color of sugar. You would then shake the bowl and press the cut side into the sprinkles to get coated. Next, a thin coat of frosting is spread along the cupcakes. Following this, you would place your petals first along the outside edge of the cupcake and slowly make your way towards the center (Tack and Richardson 138). To present these on Mother's Day, the authors suggest to, "Arrange  the flower cupcakes on a serving platter. [Buy and] trim green licorice twists to look like stems and place on the platter" (Tack and Richardson 138).

I personally really like the color scheme.

     Once again, a recipe for such great looking cupcakes doesn't get any easier, especially with the intricate help from the authors. As I said in an earlier post, even with the most basic skills needed to complete these cupcakes, Karen Tack and Alan Richardson are ready with their tips and tricks to help you, which is great when you strive for perfect cupcakes to present.


Since these are a Mother's Day - themed treat, I think I may have to make these come May 14th. Will You?

Tack, Karen and Alan Richardson. What's New, Cupcake?. New York, New York. Houghton Mifflin Harcourt Boston 2010.


Monday, January 16, 2017

Making Shortbread with Choclate chips!

I chose this recipe for shortbread because I am Scottish and shortbread is a very common item there. Traditionally, made in large wedges, then just broken off into pieces and eaten with tea. I have actually made the traditional shortbread so I was interested on how the take on shortbread would end up.
"Ingredients
  • 3/4 cups confectioners' sugar
  • 3/4 cup unsalted butter, room temperature
  • 3/4 tsp. pure vanilla extract
  • 1 1/3 cups unbleached, all purpose flour
  • 3 tbsp. cornstarch
  • 1/8 tsp salt
  • 3 oz. semisweet or bittersweet chocolate, finely chopped
  • 1/3 cup coarse grain sugar
Heat oven to 350 degrees.


Using an electric mixer, in a large bowl, beat the confectioners' sugar, butter, and vanilla, until light and fluffy. Scrape down sides and bottom of bowl.


Mix in the flour, cornstarch, and salt until blended. Stir in the chocolate pieces.


On a lightly floured surface, roll dough to a 10" square. Cut into 16 squares, and then diagonally cut each square in half.


Place each wedge 1 1/2" apart onto ungreased cookie sheets. Sprinkle tops with coarse sugar.


Bake for 9 to 12 minutes or just until edges are a light golden brown. Makes 32 pieces" (Shaffer 186).


I decided to try this recipe to see how a new and different twist on the normal shortbread I hold so closely to home. Although this recipe was fairly simple to follow, I noticed some key differences from the first time I made shortbread. I can say I probably had higher expectations for this recipe, but in the end I had many tell me it was good, although some other mixed reviews.


I, unintentionally, did not follow the recipe entirely. It calls for 1/3 of a cup of coarse grain sugar on the shortbread wedges before baking (Shaffer 186). I, of course, forgot to follow this step and didn't realize until the wedges were baking. I don't think this was a key step, but I wanted to clarify this. Also, when I tried to cut the wedges into 32 pieces, I ended up with some pieces smaller than the others. So, I had to cut and make even more wedges, ending up with more than 32 pieces.


Compared to the other times I have made traditional shortbread, I would say it is just not quite the same. For starters, the dough was much drier than it should have been before I put it in the oven. The dough would not hold together, and many of the edges would crumbles when I tried cutting the wedges. Although it wasn't very traditional, I did like the flavor, but it was more like a dry cookie than actual shortbread.


If I ever did try this recipe again, I think it would be necessary to use less flour for the dough, to keep everything together for cutting. I would likely add 3/4 of a cup of flour to the dough and see if I needed more. Also, I would add coarse sugar to the wedges before I baked them. Cutting the wedges into a more consistent shape would also be a change that I make. As for flavor, I might try using different kinds of chocolate or some other ingredient to replace the chocolate.


What do you think would be a could change for the chocolate pieces?


Shaffer, Bev. Cookies to Die For! Gretna, LA: Pelican Pub., 2009. Print.